
© Getty Images
In advance in the video: Make a winter garland out of salt dough step by step
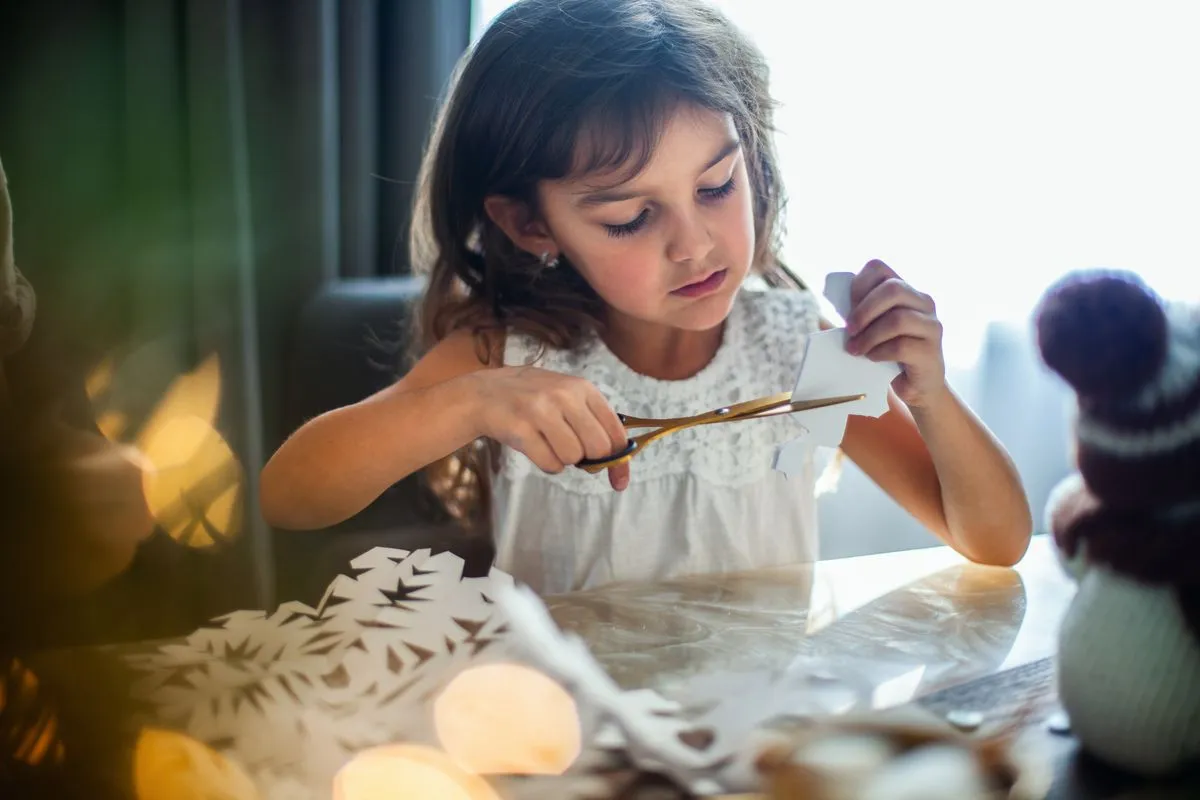
With these simple craft instructions you can create beautiful tree decorations to give as a gift or, better yet, hang them up yourself.
It's just much nicer to make your own Christmas decorations instead of buying them ready-made. In addition, annual Christmas crafts can become a beautiful tradition that makes children's hearts beat faster and also allows us adults to discover the child in us again.
That's why we'll show you detailed crafting instructions on how you can easily make funny decorative pendants for Christmas. And what motif could fit better than Santa Claus himself? It can decorate the Christmas tree alongside candles and stars, or embellish the presents as a gift pendant.
Even more craft ideas:
And we promise you, thanks to our detailed craft instructions with pictures, in which every single step is explained simply and clearly, you are guaranteed to come out with something great.
Depending on your child's skill level, the little ones can even master the individual steps without your instructions. This makes Christmas crafting all the more fun for them. So what are you waiting for?
Crafting with children at Christmas: cute Christmas tree decorations
For crafting during the Christmas season you will need the following accessories:
- Air-drying modeling clay in white, red and light pink (alternatively: polymer clay or ceramic plastic for painting; shop here on Amazon*)
- 3 cookie cutters (1 large star + 1 flower + 1 small oval shape)
- extra strong white vinyl adhesive
- Rouge Make-up
- 2 small black beads (for the eyes)
- toothpick
- Knife with a smooth blade (without teeth)
- rolling pin
- cling film
- Non-stick paper or cardboard or cardboard (e.g. baking paper)
- A ribbon or pearl necklace for hanging
- Clear varnish spray for durability
- Glitter or glitter glue
Also read:
You can also make the dough yourself by making a colorful salt dough. You can find further information here!
Important:Modeling clay and salt playdough are not suitable for consumption. So explain to your children that they are not allowed to put the dough in their mouths. If you have a small child, it makes more sense to bake edible Christmas tree decorations.
Crafting with children at Christmas: Instructions for a Santa Claus pendant
© aufeminin.com/Nathalie Q.
Crafting with children at Christmas: Santa Claus pendants for the Christmas tree.
Step 1: Roll out the dough.
© aufeminin.com/Nathalie Q.
Crafting with children at Christmas. Step 2: Cut out a star shape.
© aufeminin.com/Nathalie Q.
Crafting with children at Christmas. Step 3: Poke a hole for hanging.
Step 1:Roll out the white modeling clay to about 0.5 cm thick. Even children as young as three can do this. You'll probably have to lend a hand again when it comes to thickness. Since the modeling clay quickly becomes hard and crumbly, you should protect the leftovers from drying out and immediately wrap them in cling film.
Step 2:Have the child cut out a large star from the dough circle using a cookie cutter. If you plan to make a lot of pendants, you will of course choose several stars at the same time.
Craft tip:If you don't have cookie cutters at hand, you can replace round shapes with an upside-down glass and make a cardboard template or one out of paper in the shape of a star for the star shape. Then simply cut out the dough with a small kitchen knife.
Step 3:Use a chopstick or a particularly sturdy drinking straw to poke a hole in the star so that you can hang your homemade decorations on the Christmas tree later.
Step 4:Roll out some modeling clay again as in step one. Cover the modeling clay with cling film and cut out a flower using a cookie cutter. The cling film is used to round off the edges when cutting out. So make sure that it sits loosely on the mixture and can give way when you cut it out.
© aufeminin.com/Nathalie Q.
Crafting with children at Christmas. Step 4 & 5: Roll out the modeling clay again and cut out the flower. Then cut out a semicircle from it.
© aufeminin.com/Nathalie Q.
Crafting with children at Christmas. Step 6: Form a small ball out of pink modeling clay and print it flat.
© aufeminin.com/Nathalie Q.
Crafting with children at Christmas. Step 7: Make another smaller pink ball and stick it in the middle of the face.
© aufeminin.com/Nathalie Q.
Crafting with children at Christmas. Step 8: Use the back of the brush to create a mouth on Santa's face.
Step 5:Use an oval shape to cut out a piece of the flower; this will be the beard for your Santa Claus. If you don't have an oval cookie cutter, you can use the twist top of a soda bottle or a knife.
Step 6:Take the pink dough and roll a small ball between your hands. Press this flat and insert it into the semicircle on the beard. Now you have the Santa Claus face.
Step 7:Stick a small, pink ball in the middle of the face. Now Santa has a nose!
Step 8:What else is your Santa missing? Of course the mouth. With an upside-down brush you can 'paint' him an astonished hole-mouth.
Also read:
© aufeminin.com/Nathalie Q.
Crafting with children at Christmas. Step 9: Apply some blush to the cheeks.
© aufeminin.com/Nathalie Q.
Crafting with children at Christmas. Step 10: Press two black beads into the modeling clay above the nose as eyes.
© aufeminin.com/Nathalie Q.
Crafting with children at Christmas. Step 11: Roll the mustache.
© aufeminin.com/Nathalie Q.
Crafting with children at Christmas. Step 12: Bend the tips of the beard upwards, rounding off the cut edges.
Step 9:Use a brush to apply some blush to your little Santa's cheeks. He's always outside and has to rush to deliver all the presents in time for Christmas. That's why he always has red cheeks!
Step 10:Press two small black beads into the modeling clay above his nose so that your Santa Claus has two little eyes. The beads should be properly pressed into the modeling clay so that they don't protrude from the face.
Step 11:To make the mustache, roll a small piece of white modeling clay to a point on both sides and cut the piece of modeling clay apart in the middle.
Step 12:Bend the tapered ends slightly upwards, round off the cut ends slightly and put the mustache together under the nose. The Santa Claus face is ready!
© aufeminin.com/Nathalie Q.
Crafting with children at Christmas. Step 13: Make a hat out of red modeling clay.
© aufeminin.com/Nathalie Q.
Crafting with children at Christmas. Step 14: Put Santa's hat on.
© aufeminin.com/Nathalie Q.
Crafting with children at Christmas. Step 15: Use white clay to shape the edge of the hat and the pom-pom and lightly score both with a toothpick to make them look fluffy.
Step 13:Form a flat cone out of the red plasticine and push the tip slightly to the side to make the hat look cheekier.
Step 14:Put his hat on Santa Claus. The white pompom is coming soon...
Step 15:Glue a rolled piece of white plasticine to the edge of the hat and score the edge with a toothpick to make it look nice and fluffy. Now it's time for the pom-pom: stick a white ball on the tip of the hat and carve a fluffy pattern there too.
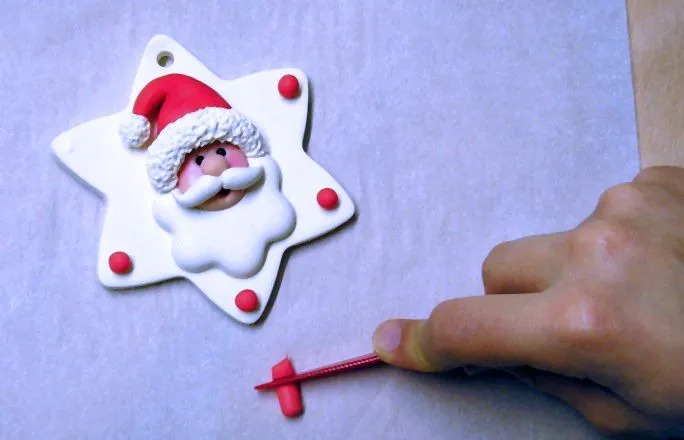
Step 16:Stick Santa Claus in the middle of the large white star (note: the hanging hole must be at the top). Cut pea-sized pieces of the red plasticine, roll these pieces into small balls and glue the red balls into the star tips. You can also stick glitter stones or small stars in the corners.
Let the Christmas tree decorations dry in a warm place on a piece of cardboard or baking paper until the next day.
Note: You should bake polymer clay according to the package instructions.
Also interesting:
Step 17:Spray your Santa Claus on all sides with clear varnish to make him last longer. If you would like to decorate the tree decoration further, you can sprinkle the star with glitter while the clear varnish is still wet.
Finally, thread a string of beads or a ribbon through the hole and hang Santa Claus on your Christmas tree, a branch or a gift. If you really enjoy making decorations for the Christmas tree yourself and whose children are enthusiastic about it, we recommend replacing St. Nicholas with other typical Christmas motifs. How about, for example, an angel, gnome, snowman or even a reindeer? There are no limits to creativity when it comes to Christmas crafts. And as we all know, children have a lot of that.
Also interesting:
Want more DIY Christmas tree decorations? In this video tutorial you will learn how you can make great pendants for the Christmas tree using conventional tape! This craft idea is so easy that your children will also have fun making Christmas crafts!
We hope it was a nice idea for you and we hope you have fun being creative together!