
Table of contents
- Which flowers are easy to press?
- Pressing flowers: the correct preparation of the flowers
- Pressing flowers: Which paper is suitable?
- Pressing flowers correctly: 4 simple methods
- Method 1: Pressing flowers with a flower press
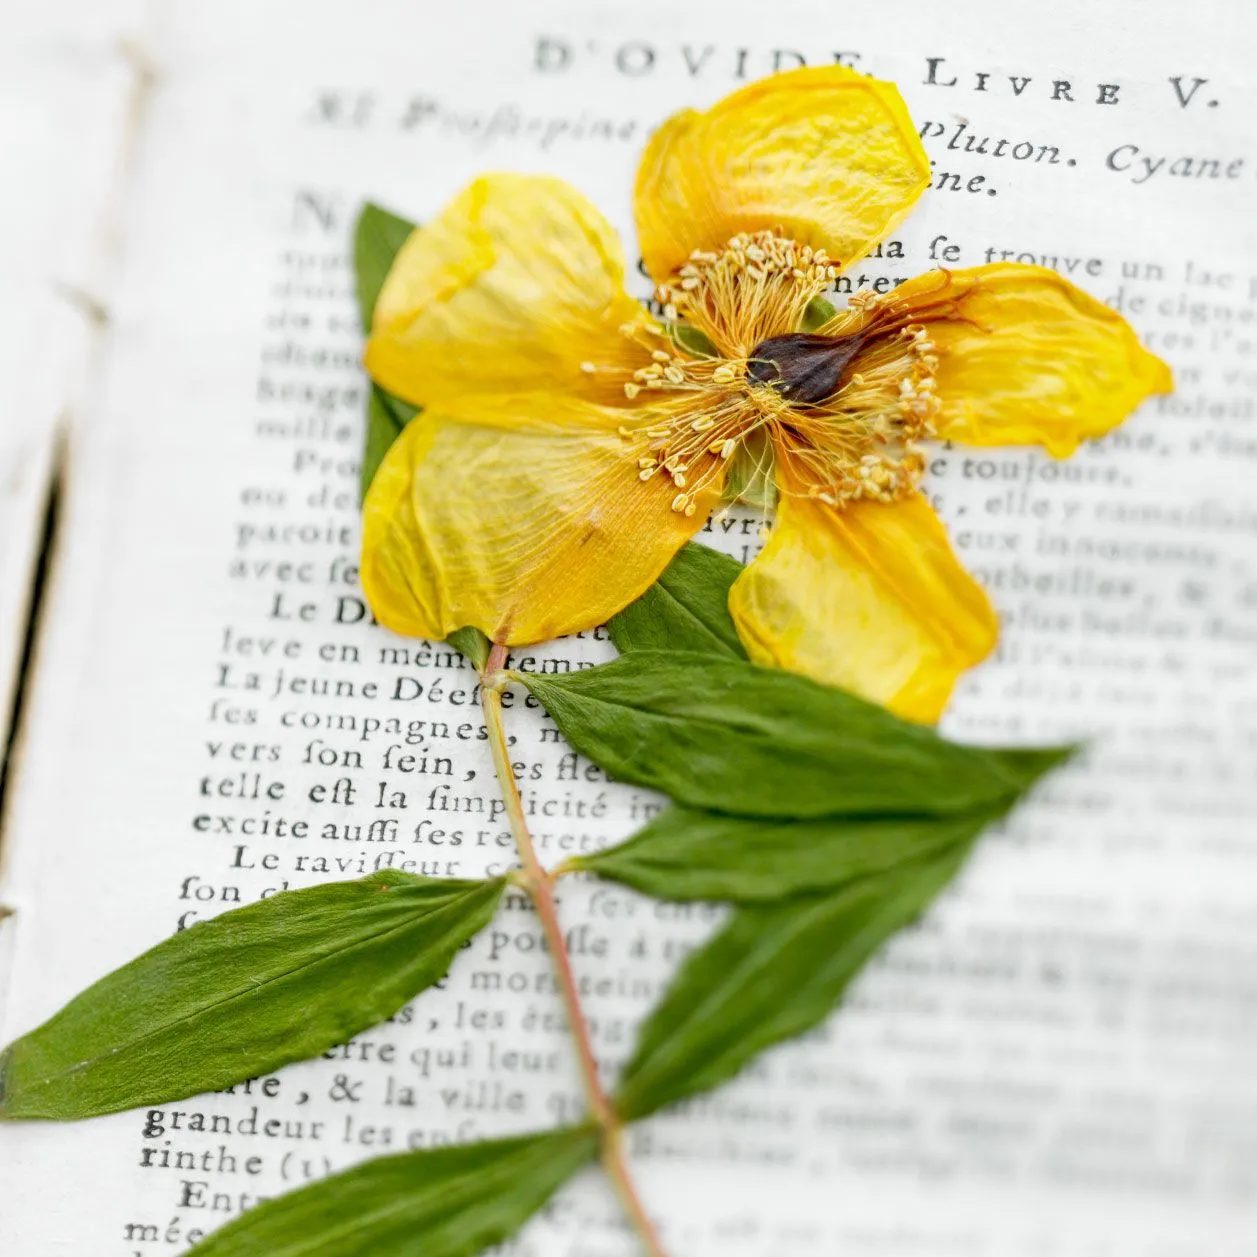
- Method 2: Press flowers with a book
- Method 3: Pressing flowers in the microwave
- Method 4: Pressing flowers with an iron
- Pressing flowers: The 3 most beautiful decoration ideas
- 1. Decoration idea: Pressed flowers in a glass frame
- 2. Decoration idea: candle with pressed flowers and leaves
- 3. Decoration idea: DIY cards with pressed flowers
Pressed flowers are an absolute eye-catcher. The dried flowers are very easy to make and give every DIY project that certain something. From greeting cards and invitations to elaborate gift packaging – you can get really creative with flat-dried flowers and leaves.
We'll tell you how to press flowers and leaves correctly. No matter whether with a self-made flower press, a book, an iron or in the microwave - here you will find valuable tips and tricks on the subject of 'pressing plants'.
At the end of the article you will find creative decoration and gift ideas for your pressed flowers and leaves. Here you can see for yourself that pressing leaves and flowers is not just for childrenis.
Which flowers are easy to press?
In general:The less moisture the fresh flowers contain when harvested, the easier they are to press. Naturally thick and fleshy plants such as roses or begonias, on the other hand, can mold more quickly.
You should also pay attention to the color stability of the flower. Some flowers lose their color and turn brown during drying.
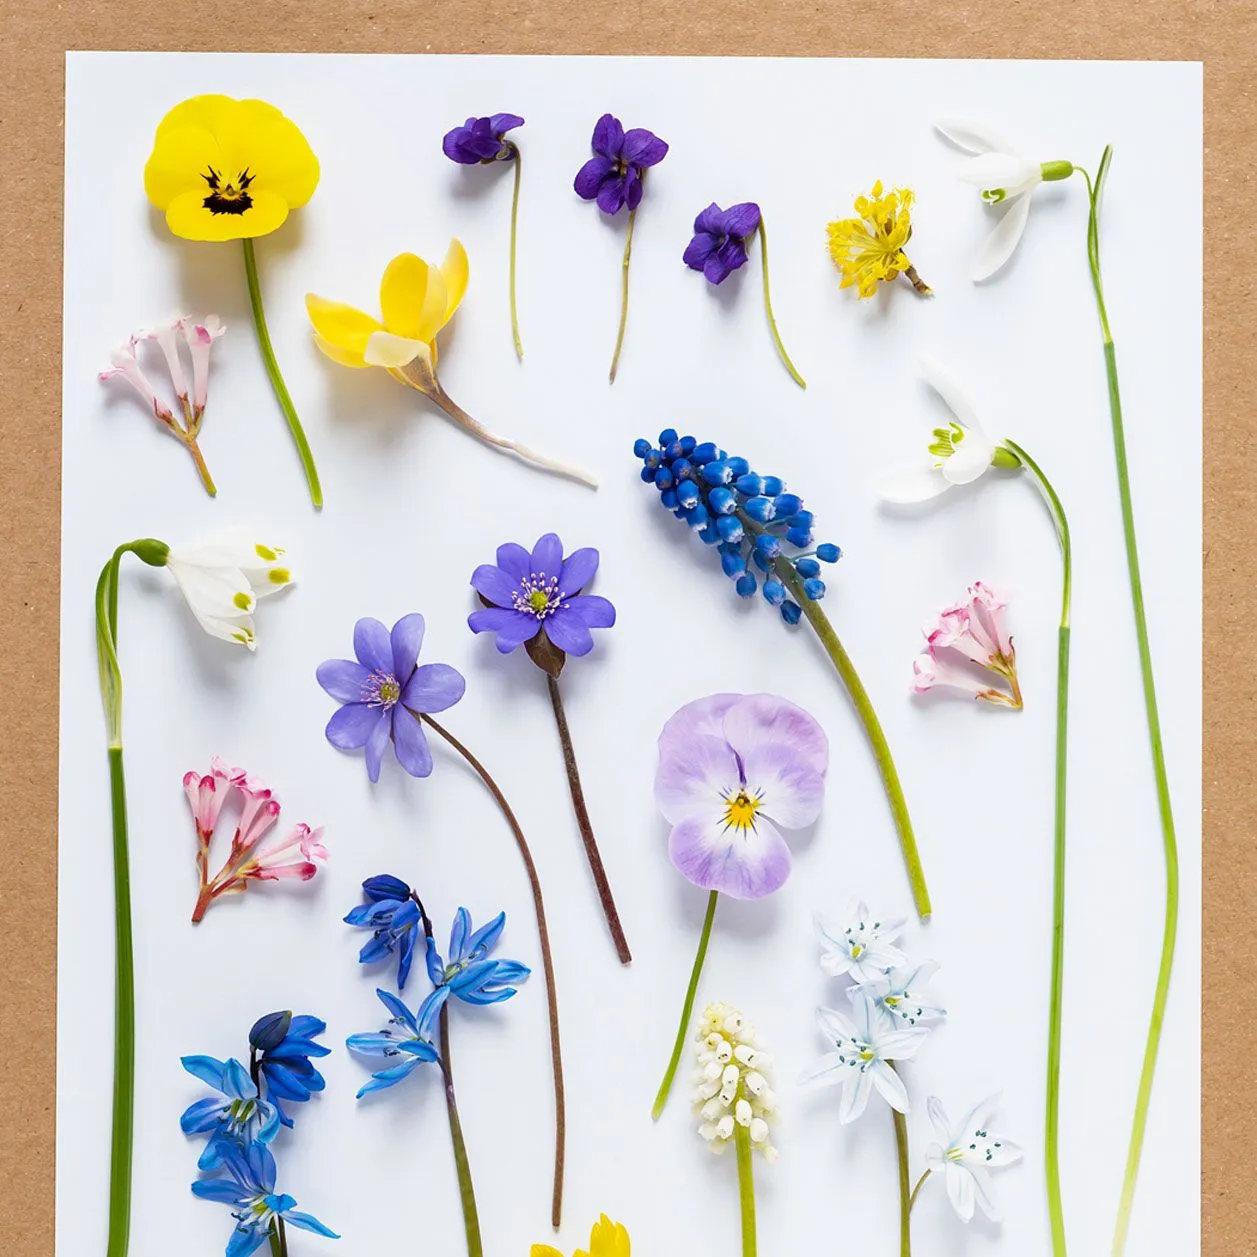
You can press these flowers without losing color:
- Mohn
- Lavender
- Geraniums
- violet
- Margerites
- Veil herb
- Elderflowers
- Rittersporn
- Kornblume
- daisy
- Pansies
- Jewelry basket
- Whorl-leaved
- Girl's eye
- Heather
- Wild carrot
Pro tip:The best time to pick wildflowers from your garden is in the morning after the dew has dried.
Pressing flowers: the correct preparation of the flowers
To prevent the flowers from losing color, you should dry the fresh flowers as quickly as possible. The correct preparation of the plants plays an important role here. For a colorful result, simply follow these five steps:
1.After picking, immediately immerse the flower stems in water. Then freshly cut the stem ends with a clean, sharp knife or scissors - at a shallow angle.
2.Place the flowers in a clean vase with water and a teaspoon of sugar. Removes low hanging or broken leaves.
3.Leave the flowers in a cool, ventilated place for a few hours. Avoid direct sunlight.
4.Take your flowers out of the vase and dry the stems thoroughly. This way you avoid the formation of mold. You should then press the flowers immediately.
5.If you want to press thick flowers like roses, you should cut them in half with scissors or a knife.Caution:This takes a lot of practice and poses a great risk of injury. A good alternative, for example, is to just press the rose petals.
Also nice:
Pressing flowers: Which paper is suitable?
To press fresh flowers, it is best to use:
- printer paper
- Flachkarton
- Corrugated cardboard
- Blotting paper
- Newspaper
- smooth coffee filters
Danger:Textured kitchen paper or creased cardboard are not suitable for pressing as they can leave marks on your petals. You should also stay away from wax paper as it doesn't allow moisture to escape.
Pressing flowers correctly: 4 simple methods
In addition to a classic wooden plant press(buy here on Amazon)*, there are also some DIY options for pressing flowers and leaves. It's best to experiment with the different methods to find the best technique for you.
Method 1: Pressing flowers with a flower press
You can quickly build a plant press yourself with a few screws and scraps of wood or cardboard. You can find out how to do this in these building instructions.
This is what you need to make a plant press:
- Leftover plywood for 2 rectangles of the same size (thickness: about 8 mm)
- Drill with wood bit about 1-2mm thicker than the screws used
- long screws, 8-10mm thick
- 4 wing nuts that match the screws
- 8 washers matching the screws
- Sanding block and sandpaper
- Clear varnish or beeswax glaze
- Corrugated cardboard (from shipping boxes)
- good scissors
1.Saw two 20 x 25 cm rectangles out of plywood. Tip: Hardware stores often have leftover wood in their sawing department and usually cut it for free.
2.Use a ruler to measure and mark the drill holes as precisely as possible. Sufficient distance from the edge should be maintained, otherwise the wood could split later.
3.Use a wood drill to drill a hole in each corner of both boards. Caution: Make sure that the holes are actually on top of each other when stacking.
4.Sand holes, edges and surfaces nice and smooth with 180 grit sandpaper.
5.Seal plywood panels with clear varnish or beeswax glaze. Let dry overnight.
6.Cut corrugated cardboard to size. Each piece of cardboard should have exactly the same side lengths as your wooden panels. A total of five to eight cardboard discs are required.
7.Cut the corners of the cardboard rectangles so far that they fit between the drill holes of the flower press with little space.
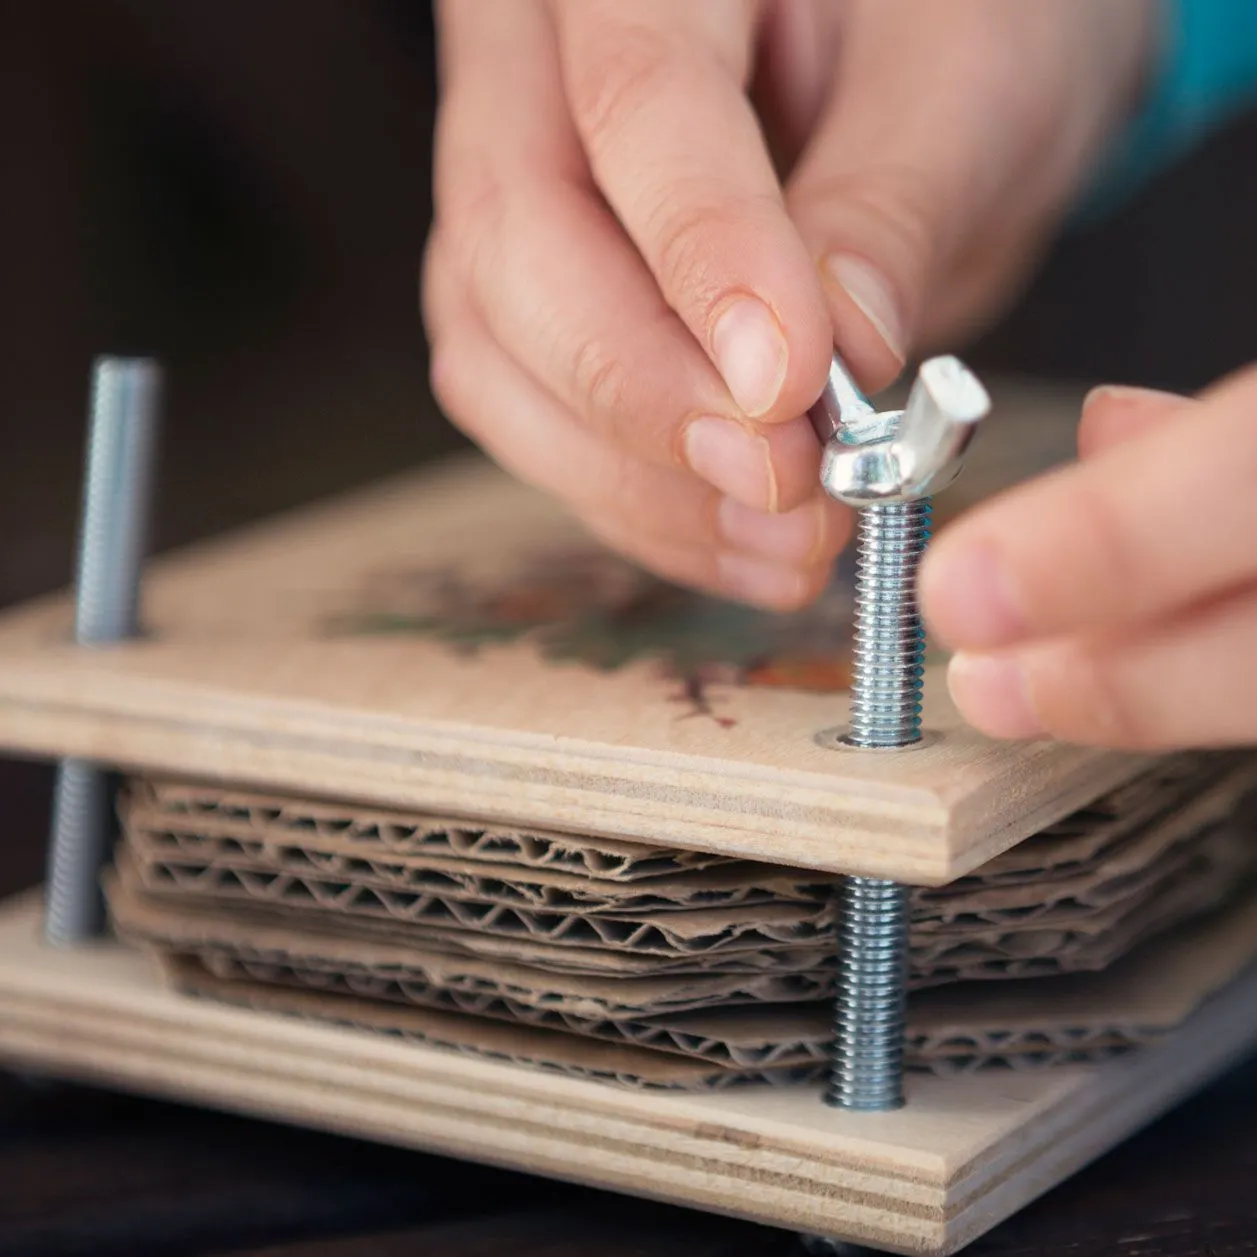
1.Push the four long screws with washers into one of the prepared wooden panels from below. You can then place the first layer of cardboard between the screws. Now your plant press is ready for the first layer of flowers or leaves.
Pro tip:Make sure your flowers don't touch each other while drying. Otherwise your flowers will stick together and can no longer be separated.

2.Alternately layer corrugated cardboard and flowers until you have used all the cardboard pieces. Try to build your stack as straight as possible. The top layer should always consist of a layer of cardboard.
3.Finally, put the second wooden plate on your four screws. Before you screw the wing nuts onto your screws, you should also insert a washer here. Now all you have to do is tighten your flower press.
Pro tip:To close the plant press particularly firmly, you can simply use a pair of pliers. This makes it easy to tighten the wing nuts. But be careful not to break the wood.
You should let your flowers dry for 1-2 weeks. If the dried flowers feel like fine tissue paper, they are ready. Do your flowers need some more time? Just put it back in the flower press and wait another week.
Over time you will get a feeling for how long your plants need to be pressed. The duration varies depending on the thickness, size and nature of the flowers. By the way: Pressing leaves is often quicker. The average drying time here is just five days.
Pro tip:In a warm place you can press your leaves and flowers faster and speed up drying. To do this, simply place your flower press on the heater or in direct sunlight.
More flower power in the video: How to make a flower crown
Make your own flower crown: It's super easy!
Method 2: Press flowers with a book
Arguably the easiest method for pressing flowers, it requires no special equipment. All you need is some absorbent paper and heavy books.
Pro tip:Petals, stems and leaves can discolor the book pages. In addition, the moisture released by the pressed plants often leads to curled paper. Therefore, only use books that are not too important to you. Telephone books and dictionaries, for example, are perfect for pressing flowers.
Pressing leaves etc. into books is very reminiscent of the principle of the flower press. Drying plants has never been so easy.
1.Place a piece of paper in the middle of your book and place a fresh flower on it. The head of the flower should point downwards. Then cover the flower with another sheet of paper. Instead of folding two sheets of paper, you can also fold a large sheet of paper. Now close the book carefully.
Pro tip:Depending on the size of the book, you can also press several flowers at the same time. But ensures that the moisture from one flower is not transferred to another. The flowers must not touch each other.
2.Use additional books or a brick to add additional weight to the book. This way your flowers will be pressed optimally.
Danger:Once you have closed the book, you should not open it again. So give yourself enough time to arrange the flowers.
3.Change the paper every few days until your flowers are completely dry.
Pro tip:Completely dried flowers are very delicate. It is best to use tweezers to remove the flowers from the book.
Similar to a flower press, pressing a book takes about two weeks. Here too, the thickness, size and nature of your plants have a major influence on the drying time. Warm, dry heating air can speed up the process.
Important:Only process the flowers, leaves and grasses once they are completely dry. In the worst case scenario, your plants could start to mold at some point.
Method 3: Pressing flowers in the microwave
If you want to use a homemade microwave ceramic tile press, here's how to do it.
1.Line the inner sides of both tiles with a piece of cardboard or kitchen paper. Then place the flowers in the middle. Now you can stack everything on top of each other.
2.Make sure that the ceramic tiles are parallel to each other. Last but not least, stretch two to four tight rubber bands around your homemade flower press to hold everything in place.
2.Turn your microwave on at the lowest temperature. Too much heat will cause your flowers to lose their color and turn brown. After 30-60 seconds you should take your construction out of the microwave again.
Caution:The press is getting extremely hot! Allow everything to cool down between each heating cycle before turning the microwave on again.
Pro tip:Using multiple ceramic presses can save you a lot of time. While one flower press is cooling down, another can do its rounds again in the microwave.
3.If the flowers are dry, it is best to dry the flowers properly using the book method or a flower press. But don't worry: after two days your dried flowers will be ready to be used.
By the way:Instead of ceramic tiles, you can also use a book to press flowers in the microwave. However, there should be no metal hidden in the binding of the book. Do not leave the book in the microwave for more than a minute at a time and allow it to cool thoroughly after each use.
Method 4: Pressing flowers with an iron
Ironing flowers is another way to speed up the drying process and is by far one of the quickest methods of all. All you need is an iron, an ironing board and absorbent paper.
Good to know:Theoretically, you could iron your flowers on a mattress. However, you can apply more pressure and dry your flowers flatter on an ironing board.
If you don't want to wait 1-2 weeks for your dried flowers, then iron pressing is just right for you. As with all methods of pressing flowers, there are a few things you should keep in mind.
1.Place the flowers between two pieces of paper and flatten them with a heavy book. This makes it easier to iron them later. You can immediately press leaves and grass with the iron.
2.Heats the iron on the lowest setting. Then press on the top sheet of paper for 10-15 seconds. You don't have to make a sliding motion like you would when ironing a shirt. Just keep the iron still.
Pro tip:Makes sure there is no water in the iron. Of course, it would be counterproductive to add moisture to the flowers during pressing.
3.Wait for the paper to cool before repeating the process. Carefully lift the paper to check whether the flower has already dried.
Pressing flowers: The 3 most beautiful decoration ideas
Pressed flowers, leaves and grasses are ideal for crafts. We have put together our favorite DIY ideas for you. Let your creative side run wild.
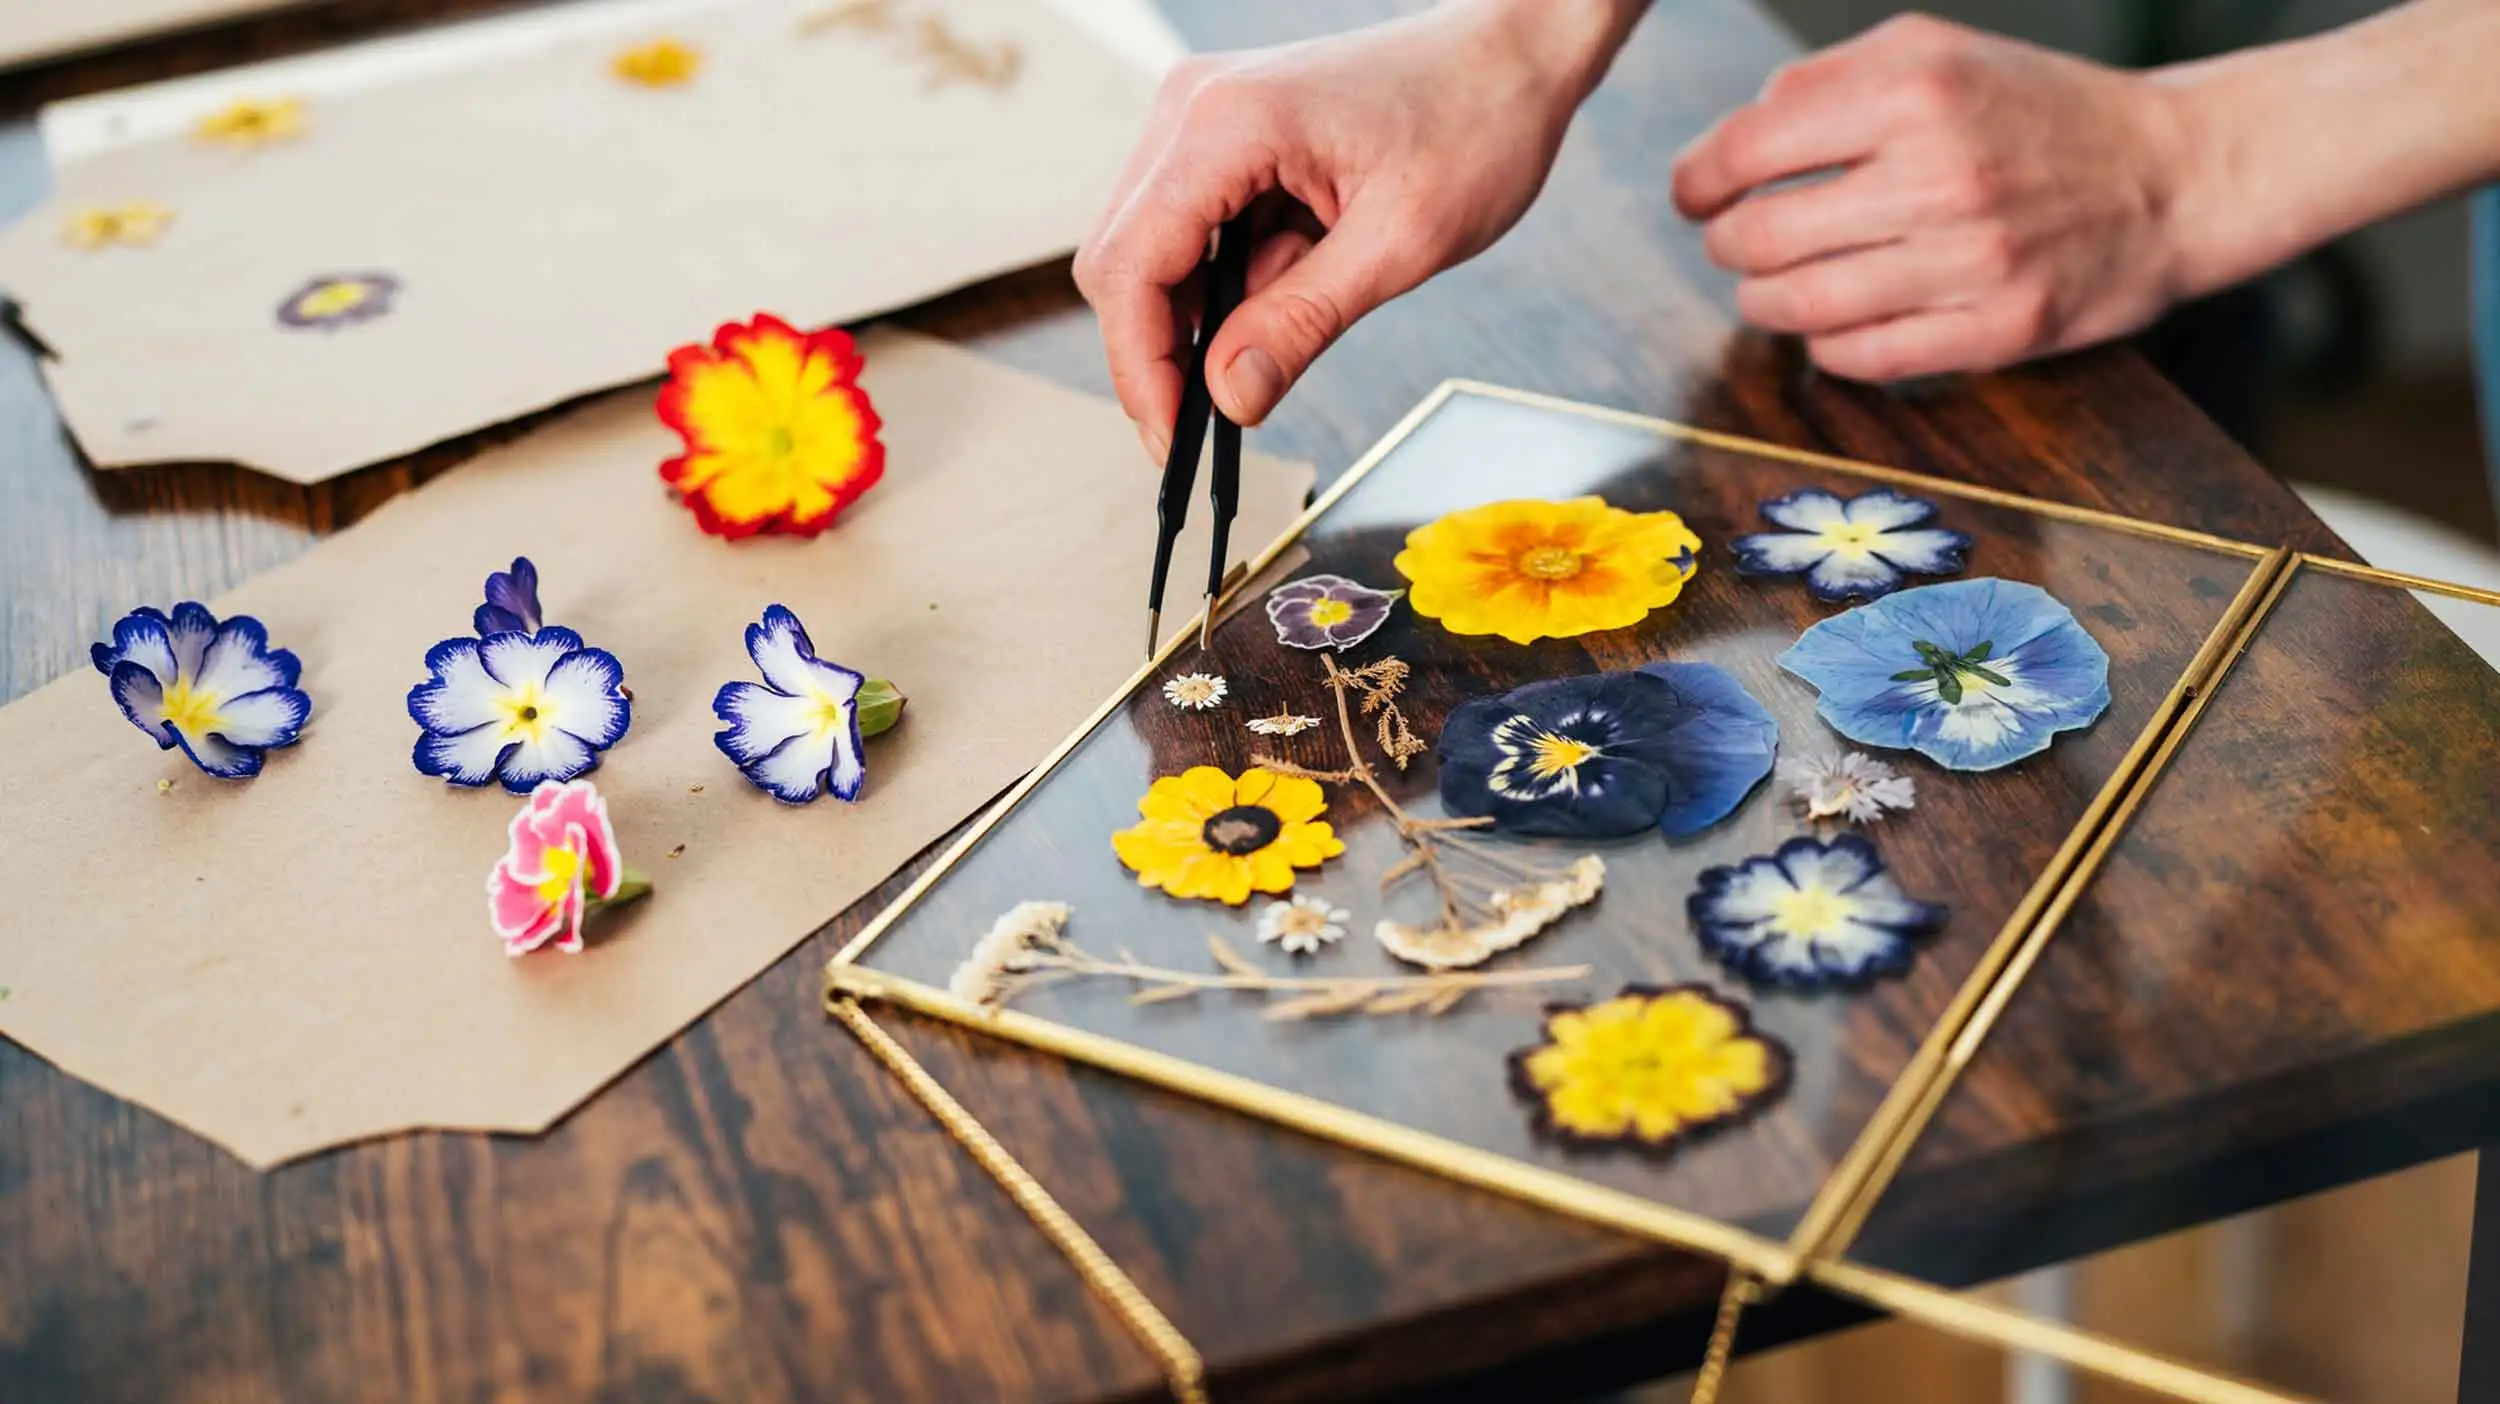
1. Decoration idea: Pressed flowers in a glass frame
Trend-Alarm:Framed in a glass picture frame(Shop glass frames here on Amazon)* your pressed flowers and leaves become an absolute decorative highlight. Also a great gift idea for a friend who loves interior design.
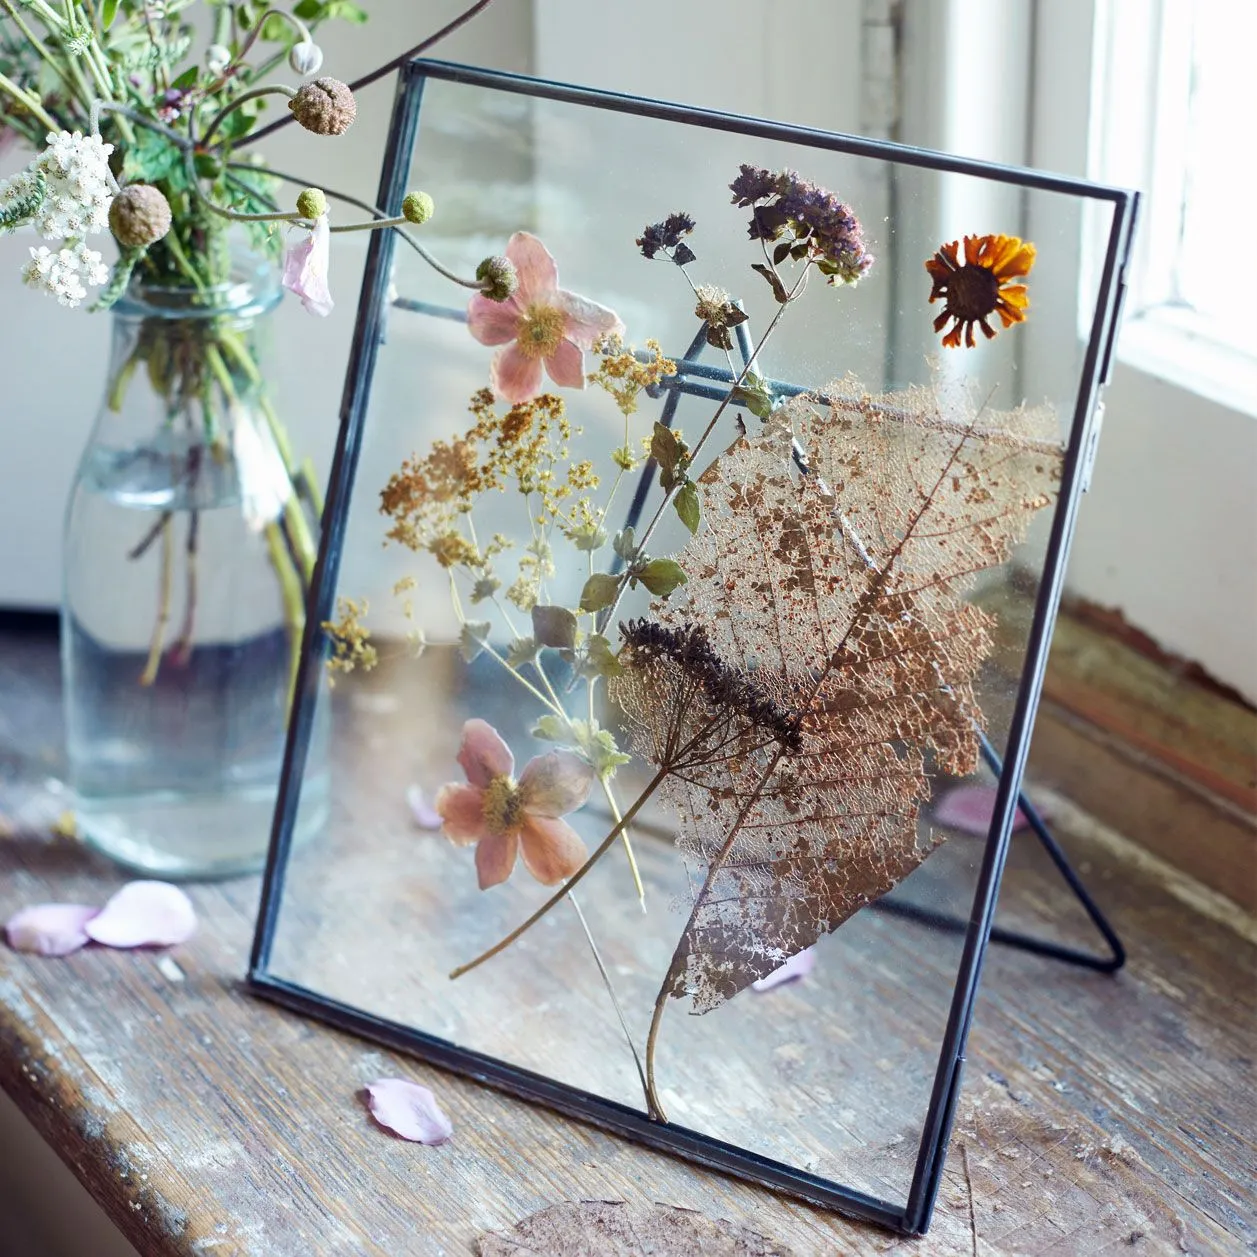
1.Choose only the most beautiful and colorful dried flowers for your glass frame. Plays with different sizes and textures. Give yourself enough time for the perfect arrangement.
2.To ensure that your dried flowers don't slip when hanging or standing up, you can fix them with double-sided adhesive tape. This will keep your design bombproof.
Pro tip:It's best to place your finished frame near a window. There the daylight can shine through your pressed flowers and make the colors really shine.
2. Decoration idea: candle with pressed flowers and leaves
Can you never have enough candles? Then this DIY idea is just right for you. With the help of your dried flowers you can transform a simple candle into a breathtaking floral art object.
This is what you need for the DIY candle:- thick pillar candle
- pressed flowers or leaves
- Tealight
- Paint brush
- tweezers
Simply make your own flower candles:
1.
Light a tea light and wait until the wax has melted. Using tweezers you can now arrange your first pressed flower on the wax of the pillar candle.
2.You can now use a flat brush to stick your pressed flower onto your pillar candle. Use the melted wax from the tealight as glue. Proceed in small steps until the entire flower is covered in a thin layer of wax.
Tipp:Blow on the liquid wax to dry it faster.
3. Repeat these steps until the entire candle is covered. Make sure that no parts of the flower get caught in the flame when burning.
Reading tip:
3. Decoration idea: DIY cards with pressed flowers
No matter whether greeting cards or: You can create unique cards with pressed flowers. We'll show you here how you can best showcase your pressed leaves and flowers.
Only with the right adhesive technique will dried flowers really stick to your card. To do this, dip a brush into some liquid glue and distribute it evenly on the underside of the flowers.
You should get every corner of your dried flowers. When sticking, be careful not to crush the fragile dried flowers.
Pro tip:Don't overdo it with the craft glue. If there is too much glue, it will take a long time to dry. In addition, ugly traces of adhesive may remain visible.
Read more: